Tutorial: Tic-Tac-Toe
Dalam tutorial ini, Anda akan membuat sebuah gim tic-tac-toe sederhana. Tutorial ini berasumsi anda tidak memiliki pengetahuan sebalumnya mengenai React. Teknik-teknik yang akan Anda pelajari di tutorial ini akan menjadi fundamental untuk membuat aplikasi apapun dengan React, dan memahami ini dengan sepenuhnya akan memberikan Anda pemahaman mendalam mengenai React.
Tutorial ini dibagi menjadi beberapa bagian:
- Persiapan untuk tutorial akan memberi Anda titik awal untuk memulai tutorial.
- Gambaran umum akan mengajarkan Anda dasar-dasar React: komponen, props, dan state.
- Menyelesaikan gim akan mengajarkan Anda teknik-teknik yang paling umum dalam pengembangan React.
- Menambahkan time travel akan memberi Anda wawasan yang lebih dalam tentang kekuatan unik React.
Apa yang akan Anda buat?
Dalam tutorial ini, Anda akan membuat gim tic-tac-toe interaktif dengan React.
Anda dapat melihat seperti apa tampilannya setelah Anda selesai di sini:
import { useState } from 'react';

function Square({ value, onSquareClick }) {
  return (
    <button className="square" onClick={onSquareClick}>
      {value}
    </button>
  );
}

function Board({ xIsNext, squares, onPlay }) {
  function handleClick(i) {
    if (calculateWinner(squares) || squares[i]) {
      return;
    }
    const nextSquares = squares.slice();
    if (xIsNext) {
      nextSquares[i] = 'X';
    } else {
      nextSquares[i] = 'O';
    }
    onPlay(nextSquares);
  }

  const winner = calculateWinner(squares);
  let status;
  if (winner) {
    status = 'Winner: ' + winner;
  } else {
    status = 'Next player: ' + (xIsNext ? 'X' : 'O');
  }

  return (
    <>
      <div className="status">{status}</div>
      <div className="board-row">
        <Square value={squares[0]} onSquareClick={() => handleClick(0)} />
        <Square value={squares[1]} onSquareClick={() => handleClick(1)} />
        <Square value={squares[2]} onSquareClick={() => handleClick(2)} />
      </div>
      <div className="board-row">
        <Square value={squares[3]} onSquareClick={() => handleClick(3)} />
        <Square value={squares[4]} onSquareClick={() => handleClick(4)} />
        <Square value={squares[5]} onSquareClick={() => handleClick(5)} />
      </div>
      <div className="board-row">
        <Square value={squares[6]} onSquareClick={() => handleClick(6)} />
        <Square value={squares[7]} onSquareClick={() => handleClick(7)} />
        <Square value={squares[8]} onSquareClick={() => handleClick(8)} />
      </div>
    </>
  );
}

export default function Game() {
  const [history, setHistory] = useState([Array(9).fill(null)]);
  const [currentMove, setCurrentMove] = useState(0);
  const xIsNext = currentMove % 2 === 0;
  const currentSquares = history[currentMove];

  function handlePlay(nextSquares) {
    const nextHistory = [...history.slice(0, currentMove + 1), nextSquares];
    setHistory(nextHistory);
    setCurrentMove(nextHistory.length - 1);
  }

  function jumpTo(nextMove) {
    setCurrentMove(nextMove);
  }

  const moves = history.map((squares, move) => {
    let description;
    if (move > 0) {
      description = 'Go to move #' + move;
    } else {
      description = 'Go to game start';
    }
    return (
      <li key={move}>
        <button onClick={() => jumpTo(move)}>{description}</button>
      </li>
    );
  });

  return (
    <div className="game">
      <div className="game-board">
        <Board xIsNext={xIsNext} squares={currentSquares} onPlay={handlePlay} />
      </div>
      <div className="game-info">
        <ol>{moves}</ol>
      </div>
    </div>
  );
}

function calculateWinner(squares) {
  const lines = [
    [0, 1, 2],
    [3, 4, 5],
    [6, 7, 8],
    [0, 3, 6],
    [1, 4, 7],
    [2, 5, 8],
    [0, 4, 8],
    [2, 4, 6],
  ];
  for (let i = 0; i < lines.length; i++) {
    const [a, b, c] = lines[i];
    if (squares[a] && squares[a] === squares[b] && squares[a] === squares[c]) {
      return squares[a];
    }
  }
  return null;
}
Jika kode tersebut masih belum masuk akal bagi Anda, atau jika Anda tidak terbiasa dengan sintaksis kode tersebut, jangan khawatir! Tujuan dari tutorial ini adalah untuk membantu Anda memahami React dan sintaksnya.
Kami sarankan Anda untuk melihat gim tic-tac-toe di atas sebelum melanjutkan dengan tutorial ini. Salah satu fitur yang akan Anda perhatikan adalah adanya daftar bernomor di sebelah kanan papan permainan. Daftar ini memberi Anda riwayat semua gerakan yang telah terjadi dalam permainan, dan diperbarui saat permainan berlangsung.
Setelah Anda bermain-main dengan gim tic-tac-toe yang sudah jadi, lanjutkan menggulir. Anda akan mulai dengan template yang lebih sederhana dalam tutorial ini. Langkah kami selanjutnya adalah menyiapkan Anda agar Anda dapat mulai membuat gim.
Persiapan untuk tutorial
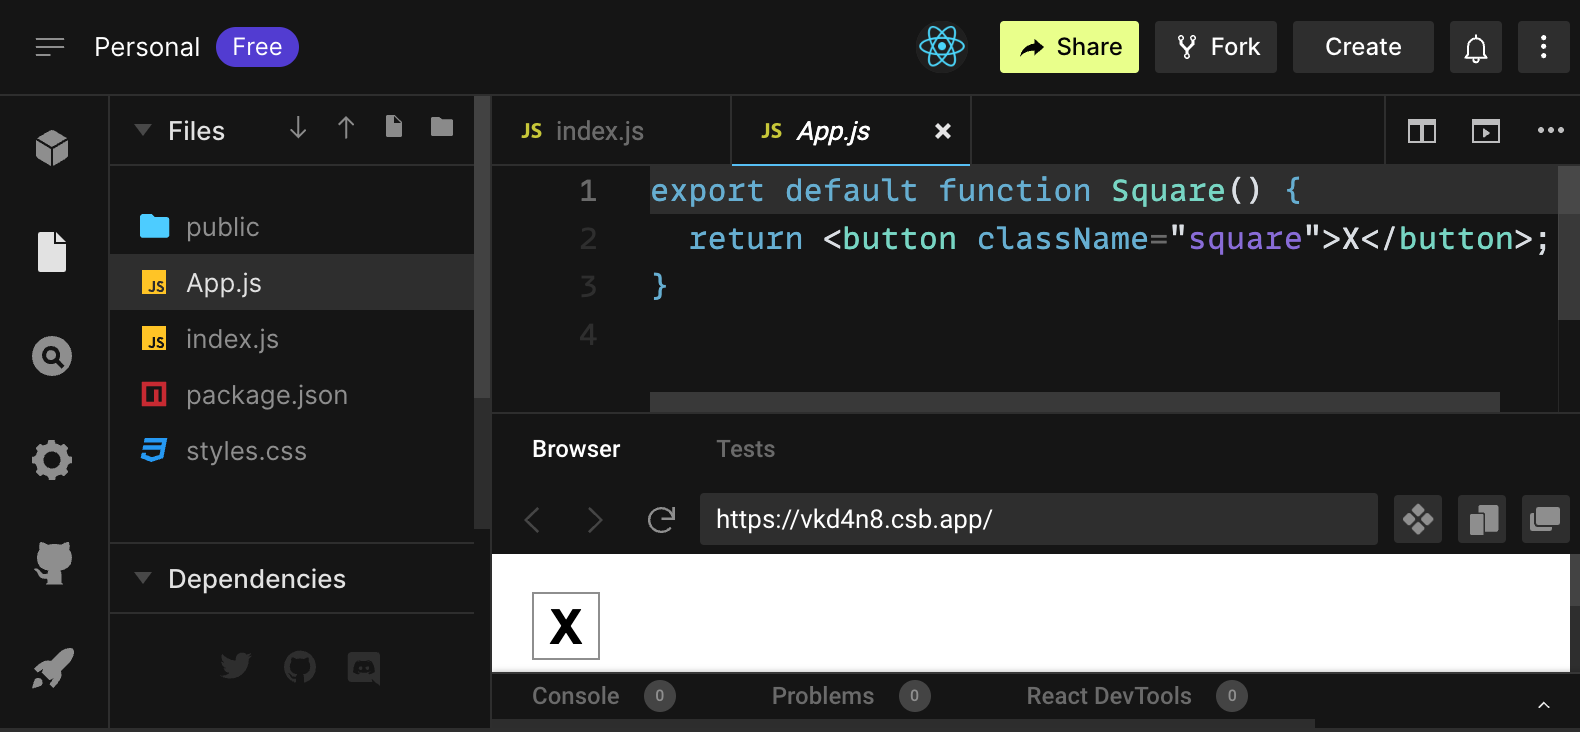
Pada editor kode langsung di bawah ini, klik Fork di pojok kanan atas untuk membuka editor di tab baru menggunakan situs web CodeSandbox. CodeSandbox memungkinkan Anda menulis kode di browser dan melihat pratinjau bagaimana pengguna akan melihat aplikasi yang Anda buat. Tab baru akan menampilkan kotak kosong dan kode awal untuk tutorial ini.
export default function Square() {
  return <button className="square">X</button>;
}
Gambaran umum
Sekarang setelah Anda siap, mari kita lihat gambaran umum tentang React!
Memeriksa kode awal
Di CodeSandbox Anda akan melihat tiga bagian utama:
- Bagian Files dengan daftar file seperti
App.js,index.js,styles.css, dan sebuah folder bernamapublic - Editor kode di mana Anda akan melihat kode sumber dari berkas yang Anda pilih
- Bagian browser di mana Anda akan melihat bagaimana kode yang Anda tulis akan ditampilkan
File App.js juga sudah terpilih di bagian Files. Isi dari file tersebut di dalam code editor seharusnya:
export default function Square() {
  return <button className="square">X</button>;
}
Bagian browser seharusnya menampilkan sebuah kotak dengan tanda X di dalamnya seperti ini:

Sekarang mari kita lihat file-file dalam kode awal.
App.js
Kode dalam App.js membuat sebuah komponen. Dalam React, komponen adalah bagian dari kode yang dapat digunakan kembali yang merepresentasikan bagian dari antarmuka pengguna. Komponen digunakan untuk merender, mengelola, dan memperbarui elemen UI dalam aplikasi Anda. Mari kita lihat komponen ini baris demi baris untuk melihat apa yang terjadi:
export default function Square() {
  return <button className="square">X</button>;
}
Baris pertama mendefinisikan sebuah fungsi bernama Square. Kata kunci JavaScript export membuat fungsi ini dapat diakses di luar berkas ini. Kata kunci default memberi tahu berkas lain yang menggunakan kode Anda bahwa ini adalah fungsi utama dalam berkas Anda.
export default function Square() {
  return <button className="square">X</button>;
}
Baris kedua mengembalikan sebuah tombol. Kata kunci JavaScript return berarti apa pun yang muncul setelahnya akan dikembalikan sebagai nilai kepada pemanggil fungsi. <button> adalah sebuah elemen JSX. Elemen JSX adalah kombinasi kode JavaScript dan tag HTML yang menjelaskan apa yang ingin Anda tampilkan. className="square" adalah properti tombol atau prop yang memberi tahu CSS cara menata tombol. X adalah teks yang ditampilkan di dalam tombol dan </button> menutup elemen JSX untuk mengindikasikan bahwa konten berikutnya tidak boleh ditempatkan di dalam tombol.
styles.css
Klik pada file berlabel styles.css di bagian Files pada CodeSandbox. File ini mendefinisikan style untuk aplikasi React Anda. Dua CSS selector pertama (* dan body) mendefinisikan style dari sebagian besar aplikasi Anda, sementara selektor .square mendefinisikan style dari setiap komponen di mana properti className disetel ke square. Dalam kode Anda, itu akan mereferensikan tombol dari komponen Square Anda di file App.js.
index.js
Klik pada file berlabel index.js di bagian Files pada CodeSandbox. Anda tidak akan mengedit file ini selama tutorial, namun file ini merupakan penghubung antara komponen yang Anda buat di file App.js dengan peramban web.
import { StrictMode } from 'react';
import { createRoot } from 'react-dom/client';
import './styles.css';

import App from './App';
Baris 1-5 menyatukan semua bagian yang diperlukan:
- React
- Library React untuk berkomunikasi dengan peramban web (React DOM)
- style untuk komponen Anda
- komponen yang Anda buat di
App.js.
Sisa dari berkas ini menyatukan semua bagian dan menyuntikkan hasil akhir ke dalam index.html di dalam folder public.
Membuat papan permainan
Mari kembali ke App.js. Di sinilah Anda akan menghabiskan sisa tutorial ini.
Saat ini papannya hanya terdiri dari satu kotak, tetapi Anda membutuhkan sembilan kotak! Jika Anda hanya mencoba menyalin dan menempelkan kotak Anda untuk membuat dua kotak seperti ini:
export default function Square() {
  return <button className="square">X</button><button className="square">X</button>;
}
Anda akan mendapatkan error berikut:
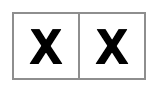
<>...</>?Komponen React harus mengembalikan satu elemen JSX dan bukan beberapa elemen JSX yang berdekatan seperti dua buah tombol. Untuk memperbaikinya, Anda dapat menggunakan fragment (<> dan </>) untuk membungkus beberapa elemen JSX yang berdekatan seperti ini:
export default function Square() {
  return (
    <>
      <button className="square">X</button>
      <button className="square">X</button>
    </>
  );
}
Sekarang Anda bisa melihat:
Bagus! Sekarang Anda hanya perlu menyalin-tempel beberapa kali untuk menambahkan sembilan kotak dan…

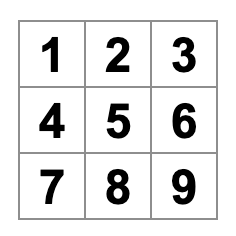
Oh tidak! Kotak-kotak tersebut berada dalam satu baris, bukan dalam grid seperti yang Anda perlukan untuk papan permainannya. Untuk mengatasinya, Anda perlu mengelompokkan kotak-kotak Anda ke dalam baris dengan div dan menambahkan beberapa kelas CSS. Selagi Anda melakukannya, Anda akan memberikan nomor pada setiap kotak untuk memastikan Anda tahu di mana setiap kotak ditampilkan.
Pada file App.js, perbarui komponen Square menjadi seperti ini:
export default function Square() {
  return (
    <>
      <div className="board-row">
        <button className="square">1</button>
        <button className="square">2</button>
        <button className="square">3</button>
      </div>
      <div className="board-row">
        <button className="square">4</button>
        <button className="square">5</button>
        <button className="square">6</button>
      </div>
      <div className="board-row">
        <button className="square">7</button>
        <button className="square">8</button>
        <button className="square">9</button>
      </div>
    </>
  );
}
CSS yang didefinisikan di styles.css memberi style pada div dengan className berupa board-row. Sekarang Anda telah mengelompokkan komponen Anda ke dalam baris dengan div yang diberi style, Anda telah memiliki papan tic-tac-toe:
Tetapi sekarang ada masalah. Komponen Anda yang bernama Square, sebenarnya bukan sebuah persegi lagi. Mari kita perbaiki dengan mengubah namanya menjadi Board:
export default function Board() {
  //...
}
Saat ini, kode Anda akan terlihat seperti ini:
export default function Board() {
  return (
    <>
      <div className="board-row">
        <button className="square">1</button>
        <button className="square">2</button>
        <button className="square">3</button>
      </div>
      <div className="board-row">
        <button className="square">4</button>
        <button className="square">5</button>
        <button className="square">6</button>
      </div>
      <div className="board-row">
        <button className="square">7</button>
        <button className="square">8</button>
        <button className="square">9</button>
      </div>
    </>
  );
}
Mengirimkan data melalui props
Selanjutnya, Anda ingin mengubah nilai kotak dari kosong menjadi “X” ketika pengguna mengklik kotak tersebut. Dengan cara Anda membuat papan sejauh ini, Anda perlu menyalin-tempel kode yang memperbarui kotak sebanyak sembilan kali (satu kali untuk setiap kotak yang Anda miliki)! Alih-alih menyalin-tempel, arsitektur komponen React memungkinkan Anda untuk membuat komponen yang dapat digunakan kembali untuk menghindari kode yang berantakan dan terduplikasi.
Pertama, Anda akan menyalin baris yang mendefinisikan kotak pertama Anda (<button className="square">1</button>) dari komponen Board ke dalam komponen Square yang baru:
function Square() {
  return <button className="square">1</button>;
}

export default function Board() {
  // ...
}
Kemudian Anda akan memperbarui komponen Board untuk merender komponen Square tersebut dengan menggunakan sintaksis JSX:
// ...
export default function Board() {
  return (
    <>
      <div className="board-row">
        <Square />
        <Square />
        <Square />
      </div>
      <div className="board-row">
        <Square />
        <Square />
        <Square />
      </div>
      <div className="board-row">
        <Square />
        <Square />
        <Square />
      </div>
    </>
  );
}
Perhatikan bagaimana tidak seperti div yang merupakan elemen untuk peramban, komponen Anda sendiri seperti Board dan Square harus dimulai dengan huruf kapital.
Mari kita lihat:
Oh tidak! Anda kehilangan kotak bernomor yang Anda miliki sebelumnya. Sekarang setiap kotak bertuliskan “1”. Untuk memperbaikinya, Anda akan menggunakan props untuk memberikan nilai yang seharusnya dimiliki setiap kotak dari komponen induk (Board) ke anaknya (Square).
Perbarui komponen Square untuk membaca props value yang akan Anda berikan dari Board:
function Square({ value }) {
  return <button className="square">1</button>;
}
function Square({ value }) menunjukkan komponen Square dapat dioper sebuah prop yang disebut value.
Sekarang Anda ingin menampilkan value tersebut, bukan 1 di setiap kotak. Coba lakukan seperti ini:
function Square({ value }) {
  return <button className="square">value</button>;
}
Ups, ini bukan yang Anda inginkan:
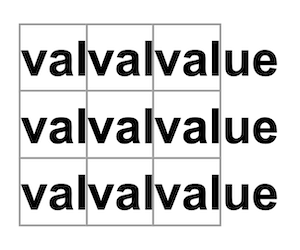
Anda ingin me-render variabel JavaScript yang disebut value dari komponen Anda, bukan kata “value”. Untuk “melarikan diri ke dalam JavaScript” dari JSX, Anda memerlukan kurung kurawal. Tambahkan tanda kurung kurawal di sekitar nilai di JSX seperti ini:
function Square({ value }) {
  return <button className="square">{value}</button>;
}
Untuk saat ini, Anda akan melihat papan kosong:
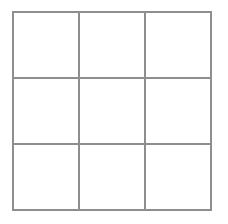
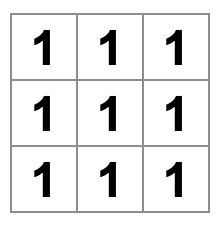
Hal ini karena komponen Board belum meneruskan prop value ke setiap komponen Square yang di-render. Untuk memperbaikinya, Anda harus menambahkan prop value ke setiap komponen Square yang dirender oleh komponen Board:
export default function Board() {
  return (
    <>
      <div className="board-row">
        <Square value="1" />
        <Square value="2" />
        <Square value="3" />
      </div>
      <div className="board-row">
        <Square value="4" />
        <Square value="5" />
        <Square value="6" />
      </div>
      <div className="board-row">
        <Square value="7" />
        <Square value="8" />
        <Square value="9" />
      </div>
    </>
  );
}
Sekarang, Anda akan melihat grid berisikan angka lagi:
Kode Anda yang telah diperbarui akan terlihat seperti ini:
function Square({ value }) {
  return <button className="square">{value}</button>;
}

export default function Board() {
  return (
    <>
      <div className="board-row">
        <Square value="1" />
        <Square value="2" />
        <Square value="3" />
      </div>
      <div className="board-row">
        <Square value="4" />
        <Square value="5" />
        <Square value="6" />
      </div>
      <div className="board-row">
        <Square value="7" />
        <Square value="8" />
        <Square value="9" />
      </div>
    </>
  );
}
Membuat komponen interaktif
Mari isi komponen Square dengan sebuah X ketika Anda mengkliknya. Deklarasikan sebuah fungsi bernama handleClick di dalam Square. Kemudian, tambahkan onClick ke properti elemen JSX tombol yang dikembalikan dari Square:
function Square({ value }) {
  function handleClick() {
    console.log('telah diklik!');
  }

  return (
    <button
      className="square"
      onClick={handleClick}
    >
      {value}
    </button>
  );
}
Jika Anda mengklik kotak sekarang, Anda akan melihat log yang bertuliskan "telah diklik!" pada tab Console di bagian bawah bagian Browser di CodeSandbox. Mengklik kotak lebih dari satu kali akan mencatat "telah diklik!" lagi. Log konsol yang berulang dengan pesan yang sama tidak akan membuat lebih banyak baris di konsol. Sebaliknya, Anda akan melihat penghitung yang bertambah di sebelah log "telah diklik!" pertama Anda.
Sebagai langkah selanjutnya, Anda ingin komponen Square “mengingat” bahwa komponen tersebut telah diklik, dan mengisinya dengan tanda “X”. Untuk “mengingat” sesuatu, komponen menggunakan state.
React menyediakan fungsi khusus bernama useState yang dapat Anda panggil dari komponen Anda untuk membuatnya “mengingat” sesuatu. Mari kita menyimpan nilai saat ini dari Square dalam state, dan mengubahnya ketika Square diklik.
Import useState di bagian atas file. Hapus props value dari komponen Square. Sebagai gantinya, tambahkan baris baru di awal Square yang memanggil useState. Buatlah ia mengembalikan sebuah variabel state yang disebut value:
import { useState } from 'react';

function Square() {
  const [value, setValue] = useState(null);

  function handleClick() {
    //...
value menyimpan nilai dan setValue adalah sebuah fungsi yang dapat digunakan untuk mengubah nilai. Nilai null yang dioper ke useState digunakan sebagai nilai awal untuk variabel state ini, sehingga value di sini dimulai dengan nilai yang sama dengan null.
Karena komponen Square tidak lagi menerima props, Anda akan menghapus props value dari kesembilan komponen Square yang dibuat oleh komponen Board:
// ...
export default function Board() {
  return (
    <>
      <div className="board-row">
        <Square />
        <Square />
        <Square />
      </div>
      <div className="board-row">
        <Square />
        <Square />
        <Square />
      </div>
      <div className="board-row">
        <Square />
        <Square />
        <Square />
      </div>
    </>
  );
}
Sekarang Anda akan mengubah Square untuk menampilkan “X” ketika diklik. Ganti event handler console.log("telah diklik!"); dengan setValue('X');. Sekarang komponen Square Anda terlihat seperti ini:
function Square() {
  const [value, setValue] = useState(null);

  function handleClick() {
    setValue('X');
  }

  return (
    <button
      className="square"
      onClick={handleClick}
    >
      {value}
    </button>
  );
}
Dengan memanggil fungsi set ini dari handler onClick, Anda memberi tahu React untuk me-render ulang Square setiap kali <button> diklik. Setelah pembaruan, nilai Square akan menjadi 'X', sehingga Anda akan melihat “X” pada papan permainan. Klik pada kotak mana pun, dan “X” akan muncul:
Setiap kotak memiliki state-nya sendiri: value yang disimpan di setiap kotak sepenuhnya independen dari yang lain. Ketika Anda memanggil fungsi set di dalam sebuah komponen, React akan secara otomatis memperbarui komponen turunan di dalamnya.
Setelah Anda melakukan perubahan di atas, kode Anda akan terlihat seperti ini:
import { useState } from 'react';

function Square() {
  const [value, setValue] = useState(null);

  function handleClick() {
    setValue('X');
  }

  return (
    <button
      className="square"
      onClick={handleClick}
    >
      {value}
    </button>
  );
}

export default function Board() {
  return (
    <>
      <div className="board-row">
        <Square />
        <Square />
        <Square />
      </div>
      <div className="board-row">
        <Square />
        <Square />
        <Square />
      </div>
      <div className="board-row">
        <Square />
        <Square />
        <Square />
      </div>
    </>
  );
}
React Developer Tools
React DevTools memungkinkan Anda untuk memeriksa props dan state dari komponen React Anda. Anda dapat menemukan tab React DevTools di bagian bawah bagian browser di CodeSandbox:
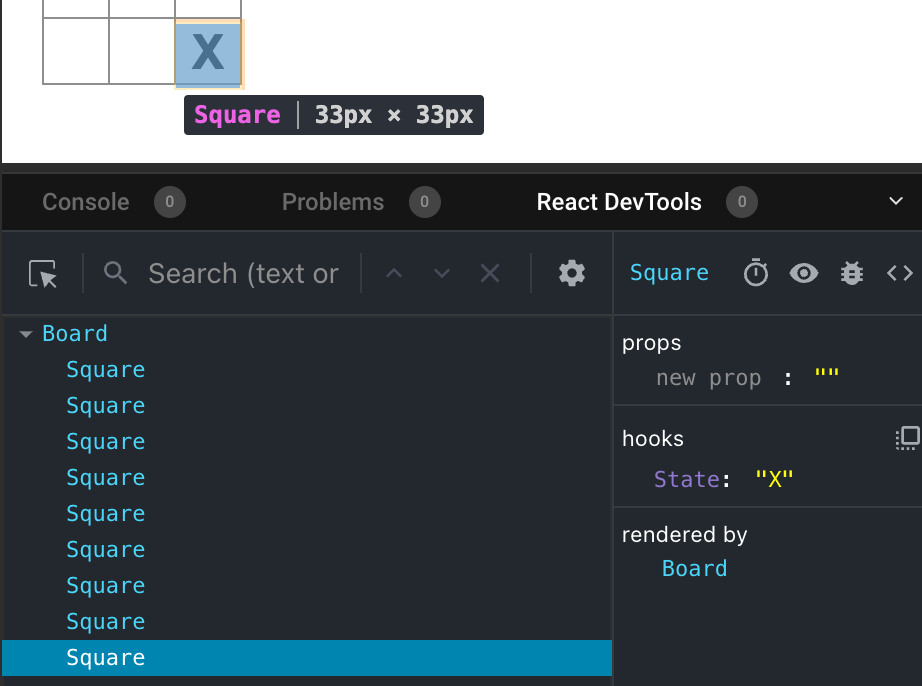
Untuk memeriksa komponen tertentu di layar, gunakan tombol di sudut kiri atas React DevTools:
Menyelesaikan gim
Sampai di sini, Anda sudah memiliki semua blok bangunan dasar untuk permainan tic-tac-toe. Untuk memiliki permainan yang lengkap, Anda sekarang perlu menempatkan “X” dan “O” secara bergantian di papan, dan Anda perlu cara untuk menentukan pemenang.
Memindahkan state ke atas
Saat ini, setiap komponen Square menyimpan sebagian dari state gim. Untuk memeriksa pemenang dalam permainan tic-tac-toe, Board harus mengetahui state masing-masing dari 9 komponen Square.
Bagaimana pendekatannya? Pada awalnya, Anda mungkin menduga bahwa Board perlu “meminta” setiap Square untuk mengetahui state dari Square tersebut. Meskipun pendekatan ini secara teknis mungkin dilakukan di React, kami tidak menyarankannya karena kodenya menjadi sulit untuk dipahami, rentan terhadap bug, dan sulit untuk di-refactor. Sebagai gantinya, pendekatan terbaik adalah dengan menyimpan state game di komponen Board induk, bukan di setiap Square. Komponen Board dapat memberi tahu setiap Square apa yang akan ditampilkan dengan mengoperkan sebuah prop, seperti yang Anda lakukan saat Anda mengoperkan sebuah angka ke setiap kotak.
Untuk mengumpulkan data dari beberapa anak, atau untuk membuat dua komponen anak berkomunikasi satu sama lain, deklarasikan state bersama dalam komponen induknya. Komponen induk dapat meneruskan state tersebut kembali ke anak melalui props. Hal ini membuat komponen anak tetap sinkron satu sama lain dan dengan induknya.
Mengangkat state ke dalam komponen induk adalah hal yang umum terjadi ketika komponen React direfaktor.
Mari kita gunakan kesempatan ini untuk mencobanya. Edit komponen Board sehingga komponen tersebut mendeklarasikan variabel state bernama squares yang secara default merupakan sebuah senarai berisi 9 null yang sesuai dengan 9 kotak:
// ...
export default function Board() {
  const [squares, setSquares] = useState(Array(9).fill(null));
  return (
    // ...
  );
}
Array(9).fill(null) membuat senarai dengan sembilan elemen dan menetapkan masing-masing elemen menjadi null. Panggilan useState() di sekelilingnya mendeklarasikan variabel status squares yang pada awalnya disetel ke senarai tersebut. Setiap entri dalam senarai berhubungan dengan nilai sebuah kotak. Ketika Anda mengisi papan nanti, senarai squares akan terlihat seperti ini:
Array(9).fill(null) creates an array with nine elements and sets each of them to null. The useState() call around it declares a squares state variable that’s initially set to that array. Each entry in the array corresponds to the value of a square. When you fill the board in later, the squares array will look like this:
['O', null, 'X', 'X', 'X', 'O', 'O', null, null]Now your Board component needs to pass the value prop down to each Square that it renders:
export default function Board() {
  const [squares, setSquares] = useState(Array(9).fill(null));
  return (
    <>
      <div className="board-row">
        <Square value={squares[0]} />
        <Square value={squares[1]} />
        <Square value={squares[2]} />
      </div>
      <div className="board-row">
        <Square value={squares[3]} />
        <Square value={squares[4]} />
        <Square value={squares[5]} />
      </div>
      <div className="board-row">
        <Square value={squares[6]} />
        <Square value={squares[7]} />
        <Square value={squares[8]} />
      </div>
    </>
  );
}
Next, you’ll edit the Square component to receive the value prop from the Board component. This will require removing the Square component’s own stateful tracking of value and the button’s onClick prop:
function Square({value}) {
  return <button className="square">{value}</button>;
}
At this point you should see an empty tic-tac-toe board:
And your code should look like this:
import { useState } from 'react';

function Square({ value }) {
  return <button className="square">{value}</button>;
}

export default function Board() {
  const [squares, setSquares] = useState(Array(9).fill(null));
  return (
    <>
      <div className="board-row">
        <Square value={squares[0]} />
        <Square value={squares[1]} />
        <Square value={squares[2]} />
      </div>
      <div className="board-row">
        <Square value={squares[3]} />
        <Square value={squares[4]} />
        <Square value={squares[5]} />
      </div>
      <div className="board-row">
        <Square value={squares[6]} />
        <Square value={squares[7]} />
        <Square value={squares[8]} />
      </div>
    </>
  );
}
Each Square will now receive a value prop that will either be 'X', 'O', or null for empty squares.
Next, you need to change what happens when a Square is clicked. The Board component now maintains which squares are filled. You’ll need to create a way for the Square to update the Board’s state. Since state is private to a component that defines it, you cannot update the Board’s state directly from Square.
Instead, you’ll pass down a function from the Board component to the Square component, and you’ll have Square call that function when a square is clicked. You’ll start with the function that the Square component will call when it is clicked. You’ll call that function onSquareClick:
function Square({ value }) {
  return (
    <button className="square" onClick={onSquareClick}>
      {value}
    </button>
  );
}
Next, you’ll add the onSquareClick function to the Square component’s props:
function Square({ value, onSquareClick }) {
  return (
    <button className="square" onClick={onSquareClick}>
      {value}
    </button>
  );
}
Now you’ll connect the onSquareClick prop to a function in the Board component that you’ll name handleClick. To connect onSquareClick to handleClick you’ll pass a function to the onSquareClick prop of the first Square component:
export default function Board() {
  const [squares, setSquares] = useState(Array(9).fill(null));

  return (
    <>
      <div className="board-row">
        <Square value={squares[0]} onSquareClick={handleClick} />
        //...
  );
}
Lastly, you will define the handleClick function inside the Board component to update the squares array holding your board’s state:
export default function Board() {
  const [squares, setSquares] = useState(Array(9).fill(null));

  function handleClick() {
    const nextSquares = squares.slice();
    nextSquares[0] = "X";
    setSquares(nextSquares);
  }

  return (
    // ...
  )
}
The handleClick function creates a copy of the squares array (nextSquares) with the JavaScript slice() Array method. Then, handleClick updates the nextSquares array to add X to the first ([0] index) square.
Calling the setSquares function lets React know the state of the component has changed. This will trigger a re-render of the components that use the squares state (Board) as well as its child components (the Square components that make up the board).
Now you can add X’s to the board… but only to the upper left square. Your handleClick function is hardcoded to update the index for the upper left square (0). Let’s update handleClick to be able to update any square. Add an argument i to the handleClick function that takes the index of the square to update:
export default function Board() {
  const [squares, setSquares] = useState(Array(9).fill(null));

  function handleClick(i) {
    const nextSquares = squares.slice();
    nextSquares[i] = "X";
    setSquares(nextSquares);
  }

  return (
    // ...
  )
}
Next, you will need to pass that i to handleClick. You could try to set the onSquareClick prop of square to be handleClick(0) directly in the JSX like this, but it won’t work:
<Square value={squares[0]} onSquareClick={handleClick(0)} />Here is why this doesn’t work. The handleClick(0) call will be a part of rendering the board component. Because handleClick(0) alters the state of the board component by calling setSquares, your entire board component will be re-rendered again. But this runs handleClick(0) again, leading to an infinite loop:
Why didn’t this problem happen earlier?
When you were passing onSquareClick={handleClick}, you were passing the handleClick function down as a prop. You were not calling it! But now you are calling that function right away—notice the parentheses in handleClick(0)—and that’s why it runs too early. You don’t want to call handleClick until the user clicks!
You could fix by creating a function like handleFirstSquareClick that calls handleClick(0), a function like handleSecondSquareClick that calls handleClick(1), and so on. You would pass (rather than call) these functions down as props like onSquareClick={handleFirstSquareClick}. This would solve the infinite loop.
However, defining nine different functions and giving each of them a name is too verbose. Instead, let’s do this:
export default function Board() {
  // ...
  return (
    <>
      <div className="board-row">
        <Square value={squares[0]} onSquareClick={() => handleClick(0)} />
        // ...
  );
}
Notice the new () => syntax. Here, () => handleClick(0) is an arrow function, which is a shorter way to define functions. When the square is clicked, the code after the => “arrow” will run, calling handleClick(0).
Now you need to update the other eight squares to call handleClick from the arrow functions you pass. Make sure that the argument for each call of the handleClick corresponds to the index of the correct square:
export default function Board() {
  // ...
  return (
    <>
      <div className="board-row">
        <Square value={squares[0]} onSquareClick={() => handleClick(0)} />
        <Square value={squares[1]} onSquareClick={() => handleClick(1)} />
        <Square value={squares[2]} onSquareClick={() => handleClick(2)} />
      </div>
      <div className="board-row">
        <Square value={squares[3]} onSquareClick={() => handleClick(3)} />
        <Square value={squares[4]} onSquareClick={() => handleClick(4)} />
        <Square value={squares[5]} onSquareClick={() => handleClick(5)} />
      </div>
      <div className="board-row">
        <Square value={squares[6]} onSquareClick={() => handleClick(6)} />
        <Square value={squares[7]} onSquareClick={() => handleClick(7)} />
        <Square value={squares[8]} onSquareClick={() => handleClick(8)} />
      </div>
    </>
  );
};
Now you can again add X’s to any square on the board by clicking on them:
But this time all the state management is handled by the Board component!
This is what your code should look like:
import { useState } from 'react';

function Square({ value, onSquareClick }) {
  return (
    <button className="square" onClick={onSquareClick}>
      {value}
    </button>
  );
}

export default function Board() {
  const [squares, setSquares] = useState(Array(9).fill(null));

  function handleClick(i) {
    const nextSquares = squares.slice();
    nextSquares[i] = 'X';
    setSquares(nextSquares);
  }

  return (
    <>
      <div className="board-row">
        <Square value={squares[0]} onSquareClick={() => handleClick(0)} />
        <Square value={squares[1]} onSquareClick={() => handleClick(1)} />
        <Square value={squares[2]} onSquareClick={() => handleClick(2)} />
      </div>
      <div className="board-row">
        <Square value={squares[3]} onSquareClick={() => handleClick(3)} />
        <Square value={squares[4]} onSquareClick={() => handleClick(4)} />
        <Square value={squares[5]} onSquareClick={() => handleClick(5)} />
      </div>
      <div className="board-row">
        <Square value={squares[6]} onSquareClick={() => handleClick(6)} />
        <Square value={squares[7]} onSquareClick={() => handleClick(7)} />
        <Square value={squares[8]} onSquareClick={() => handleClick(8)} />
      </div>
    </>
  );
}
Now that your state handling is in the Board component, the parent Board component passes props to the child Square components so that they can be displayed correctly. When clicking on a Square, the child Square component now asks the parent Board component to update the state of the board. When the Board’s state changes, both the Board component and every child Square re-renders automatically. Keeping the state of all squares in the Board component will allow it to determine the winner in the future.
Let’s recap what happens when a user clicks the top left square on your board to add an X to it:
- Clicking on the upper left square runs the function that the
buttonreceived as itsonClickprop from theSquare. TheSquarecomponent received that function as itsonSquareClickprop from theBoard. TheBoardcomponent defined that function directly in the JSX. It callshandleClickwith an argument of0. handleClickuses the argument (0) to update the first element of thesquaresarray fromnulltoX.- The
squaresstate of theBoardcomponent was updated, so theBoardand all of its children re-render. This causes thevalueprop of theSquarecomponent with index0to change fromnulltoX.
In the end the user sees that the upper left square has changed from empty to having a X after clicking it.
Why immutability is important
Note how in handleClick, you call .slice() to create a copy of the squares array instead of modifying the existing array. To explain why, we need to discuss immutability and why immutability is important to learn.
There are generally two approaches to changing data. The first approach is to mutate the data by directly changing the data’s values. The second approach is to replace the data with a new copy which has the desired changes. Here is what it would look like if you mutated the squares array:
const squares = [null, null, null, null, null, null, null, null, null];
squares[0] = 'X';
// Now `squares` is ["X", null, null, null, null, null, null, null, null];
And here is what it would look like if you changed data without mutating the squares array:
const squares = [null, null, null, null, null, null, null, null, null];
const nextSquares = ['X', null, null, null, null, null, null, null, null];
// Now `squares` is unchanged, but `nextSquares` first element is 'X' rather than `null`
The result is the same but by not mutating (changing the underlying data) directly, you gain several benefits.
Immutability makes complex features much easier to implement. Later in this tutorial, you will implement a “time travel” feature that lets you review the game’s history and “jump back” to past moves. This functionality isn’t specific to games—an ability to undo and redo certain actions is a common requirement for apps. Avoiding direct data mutation lets you keep previous versions of the data intact, and reuse them later.
There is also another benefit of immutability. By default, all child components re-render automatically when the state of a parent component changes. This includes even the child components that weren’t affected by the change. Although re-rendering is not by itself noticeable to the user (you shouldn’t actively try to avoid it!), you might want to skip re-rendering a part of the tree that clearly wasn’t affected by it for performance reasons. Immutability makes it very cheap for components to compare whether their data has changed or not. You can learn more about how React chooses when to re-render a component in the memo API reference.
Taking turns
It’s now time to fix a major defect in this tic-tac-toe game: the “O”s cannot be marked on the board.
You’ll set the first move to be “X” by default. Let’s keep track of this by adding another piece of state to the Board component:
function Board() {
  const [xIsNext, setXIsNext] = useState(true);
  const [squares, setSquares] = useState(Array(9).fill(null));

  // ...
}
Each time a player moves, xIsNext (a boolean) will be flipped to determine which player goes next and the game’s state will be saved. You’ll update the Board’s handleClick function to flip the value of xIsNext:
export default function Board() {
  const [xIsNext, setXIsNext] = useState(true);
  const [squares, setSquares] = useState(Array(9).fill(null));

  function handleClick(i) {
    const nextSquares = squares.slice();
    if (xIsNext) {
      nextSquares[i] = "X";
    } else {
      nextSquares[i] = "O";
    }
    setSquares(nextSquares);
    setXIsNext(!xIsNext);
  }

  return (
    //...
  );
}
Now, as you click on different squares, they will alternate between X and O, as they should!
But wait, there’s a problem. Try clicking on the same square multiple times:
The X is overwritten by an O! While this would add a very interesting twist to the game, we’re going to stick to the original rules for now.
When you mark a square with a X or an O you aren’t first checking to see if the square already has a X or O value. You can fix this by returning early. You’ll check to see if the square already has a X or an O. If the square is already filled, you will return in the handleClick function early—before it tries to update the board state.
function handleClick(i) {
  if (squares[i]) {
    return;
  }
  const nextSquares = squares.slice();
  //...
}
Now you can only add X’s or O’s to empty squares! Here is what your code should look like at this point:
import { useState } from 'react';

function Square({value, onSquareClick}) {
  return (
    <button className="square" onClick={onSquareClick}>
      {value}
    </button>
  );
}

export default function Board() {
  const [xIsNext, setXIsNext] = useState(true);
  const [squares, setSquares] = useState(Array(9).fill(null));

  function handleClick(i) {
    if (squares[i]) {
      return;
    }
    const nextSquares = squares.slice();
    if (xIsNext) {
      nextSquares[i] = 'X';
    } else {
      nextSquares[i] = 'O';
    }
    setSquares(nextSquares);
    setXIsNext(!xIsNext);
  }

  return (
    <>
      <div className="board-row">
        <Square value={squares[0]} onSquareClick={() => handleClick(0)} />
        <Square value={squares[1]} onSquareClick={() => handleClick(1)} />
        <Square value={squares[2]} onSquareClick={() => handleClick(2)} />
      </div>
      <div className="board-row">
        <Square value={squares[3]} onSquareClick={() => handleClick(3)} />
        <Square value={squares[4]} onSquareClick={() => handleClick(4)} />
        <Square value={squares[5]} onSquareClick={() => handleClick(5)} />
      </div>
      <div className="board-row">
        <Square value={squares[6]} onSquareClick={() => handleClick(6)} />
        <Square value={squares[7]} onSquareClick={() => handleClick(7)} />
        <Square value={squares[8]} onSquareClick={() => handleClick(8)} />
      </div>
    </>
  );
}
Declaring a winner
Now that the players can take turns, you’ll want to show when the game is won and there are no more turns to make. To do this you’ll add a helper function called calculateWinner that takes an array of 9 squares, checks for a winner and returns 'X', 'O', or null as appropriate. Don’t worry too much about the calculateWinner function; it’s not specific to React:
export default function Board() {
  //...
}

function calculateWinner(squares) {
  const lines = [
    [0, 1, 2],
    [3, 4, 5],
    [6, 7, 8],
    [0, 3, 6],
    [1, 4, 7],
    [2, 5, 8],
    [0, 4, 8],
    [2, 4, 6]
  ];
  for (let i = 0; i < lines.length; i++) {
    const [a, b, c] = lines[i];
    if (squares[a] && squares[a] === squares[b] && squares[a] === squares[c]) {
      return squares[a];
    }
  }
  return null;
}You will call calculateWinner(squares) in the Board component’s handleClick function to check if a player has won. You can perform this check at the same time you check if a user has clicked a square that already has a X or and O. We’d like to return early in both cases:
function handleClick(i) {
  if (squares[i] || calculateWinner(squares)) {
    return;
  }
  const nextSquares = squares.slice();
  //...
}
To let the players know when the game is over, you can display text such as “Winner: X” or “Winner: O”. To do that you’ll add a status section to the Board component. The status will display the winner if the game is over and if the game is ongoing you’ll display which player’s turn is next:
export default function Board() {
  // ...
  const winner = calculateWinner(squares);
  let status;
  if (winner) {
    status = "Winner: " + winner;
  } else {
    status = "Next player: " + (xIsNext ? "X" : "O");
  }

  return (
    <>
      <div className="status">{status}</div>
      <div className="board-row">
        // ...
  )
}
Congratulations! You now have a working tic-tac-toe game. And you’ve just learned the basics of React too. So you are the real winner here. Here is what the code should look like:
import { useState } from 'react';

function Square({value, onSquareClick}) {
  return (
    <button className="square" onClick={onSquareClick}>
      {value}
    </button>
  );
}

export default function Board() {
  const [xIsNext, setXIsNext] = useState(true);
  const [squares, setSquares] = useState(Array(9).fill(null));

  function handleClick(i) {
    if (calculateWinner(squares) || squares[i]) {
      return;
    }
    const nextSquares = squares.slice();
    if (xIsNext) {
      nextSquares[i] = 'X';
    } else {
      nextSquares[i] = 'O';
    }
    setSquares(nextSquares);
    setXIsNext(!xIsNext);
  }

  const winner = calculateWinner(squares);
  let status;
  if (winner) {
    status = 'Winner: ' + winner;
  } else {
    status = 'Next player: ' + (xIsNext ? 'X' : 'O');
  }

  return (
    <>
      <div className="status">{status}</div>
      <div className="board-row">
        <Square value={squares[0]} onSquareClick={() => handleClick(0)} />
        <Square value={squares[1]} onSquareClick={() => handleClick(1)} />
        <Square value={squares[2]} onSquareClick={() => handleClick(2)} />
      </div>
      <div className="board-row">
        <Square value={squares[3]} onSquareClick={() => handleClick(3)} />
        <Square value={squares[4]} onSquareClick={() => handleClick(4)} />
        <Square value={squares[5]} onSquareClick={() => handleClick(5)} />
      </div>
      <div className="board-row">
        <Square value={squares[6]} onSquareClick={() => handleClick(6)} />
        <Square value={squares[7]} onSquareClick={() => handleClick(7)} />
        <Square value={squares[8]} onSquareClick={() => handleClick(8)} />
      </div>
    </>
  );
}

function calculateWinner(squares) {
  const lines = [
    [0, 1, 2],
    [3, 4, 5],
    [6, 7, 8],
    [0, 3, 6],
    [1, 4, 7],
    [2, 5, 8],
    [0, 4, 8],
    [2, 4, 6],
  ];
  for (let i = 0; i < lines.length; i++) {
    const [a, b, c] = lines[i];
    if (squares[a] && squares[a] === squares[b] && squares[a] === squares[c]) {
      return squares[a];
    }
  }
  return null;
}
Adding time travel
As a final exercise, let’s make it possible to “go back in time” to the previous moves in the game.
Storing a history of moves
If you mutated the squares array, implementing time travel would be very difficult.
However, you used slice() to create a new copy of the squares array after every move, and treated it as immutable. This will allow you to store every past version of the squares array, and navigate between the turns that have already happened.
You’ll store the past squares arrays in another array called history, which you’ll store as a new state variable. The history array represents all board states, from the first to the last move, and has a shape like this:
[
  // Before first move
  [null, null, null, null, null, null, null, null, null],
  // After first move
  [null, null, null, null, 'X', null, null, null, null],
  // After second move
  [null, null, null, null, 'X', null, null, null, 'O'],
  // ...
]
Lifting state up, again
You will now write a new top-level component called Game to display a list of past moves. That’s where you will place the history state that contains the entire game history.
Placing the history state into the Game component will let you remove the squares state from its child Board component. Just like you “lifted state up” from the Square component into the Board component, you will now lift it up from the Board into the top-level Game component. This gives the Game component full control over the Board’s data and lets it instruct the Board to render previous turns from the history.
First, add a Game component with export default. Have it render the Board component and some markup:
function Board() {
  // ...
}

export default function Game() {
  return (
    <div className="game">
      <div className="game-board">
        <Board />
      </div>
      <div className="game-info">
        <ol>{/*TODO*/}</ol>
      </div>
    </div>
  );
}
Note that you are removing the export default keywords before the function Board() { declaration and adding them before the function Game() { declaration. This tells your index.js file to use the Game component as the top-level component instead of your Board component. The additional divs returned by the Game component are making room for the game information you’ll add to the board later.
Add some state to the Game component to track which player is next and the history of moves:
export default function Game() {
  const [xIsNext, setXIsNext] = useState(true);
  const [history, setHistory] = useState([Array(9).fill(null)]);
  // ...
Notice how [Array(9).fill(null)] is an array with a single item, which itself is an array of 9 nulls.
To render the squares for the current move, you’ll want to read the last squares array from the history. You don’t need useState for this—you already have enough information to calculate it during rendering:
export default function Game() {
  const [xIsNext, setXIsNext] = useState(true);
  const [history, setHistory] = useState([Array(9).fill(null)]);
  const currentSquares = history[history.length - 1];
  // ...
Next, create a handlePlay function inside the Game component that will be called by the Board component to update the game. Pass xIsNext, currentSquares and handlePlay as props to the Board component:
export default function Game() {
  const [xIsNext, setXIsNext] = useState(true);
  const [history, setHistory] = useState([Array(9).fill(null)]);
  const currentSquares = history[history.length - 1];

  function handlePlay(nextSquares) {
    // TODO
  }

  return (
    <div className="game">
      <div className="game-board">
        <Board xIsNext={xIsNext} squares={currentSquares} onPlay={handlePlay} />
        //...
  )
}
Let’s make the Board component fully controlled by the props it receives. Change the Board component to take three props: xIsNext, squares, and a new onPlay function that Board can call with the updated squares array when a player makes a move. Next, remove the first two lines of the Board function that call useState:
function Board({ xIsNext, squares, onPlay }) {
  function handleClick(i) {
    //...
  }
  // ...
}
Now replace the setSquares and setXIsNext calls in handleClick in the Board component with a single call to your new onPlay function so the Game component can update the Board when the user clicks a square:
function Board({ xIsNext, squares, onPlay }) {
  function handleClick(i) {
    if (calculateWinner(squares) || squares[i]) {
      return;
    }
    const nextSquares = squares.slice();
    if (xIsNext) {
      nextSquares[i] = "X";
    } else {
      nextSquares[i] = "O";
    }
    onPlay(nextSquares);
  }
  //...
}
The Board component is fully controlled by the props passed to it by the Game component. You need to implement the handlePlay function in the Game component to get the game working again.
What should handlePlay do when called? Remember that Board used to call setSquares with an updated array; now it passes the updated squares array to onPlay.
The handlePlay function needs to update Game’s state to trigger a re-render, but you don’t have a setSquares function that you can call any more—you’re now using the history state variable to store this information. You’ll want to update history by appending the updated squares array as a new history entry. You also want to toggle xIsNext, just as Board used to do:
export default function Game() {
  //...
  function handlePlay(nextSquares) {
    setHistory([...history, nextSquares]);
    setXIsNext(!xIsNext);
  }
  //...
}
Here, [...history, nextSquares] creates a new array that contains all the items in history, followed by nextSquares. (You can read the ...history spread syntax as “enumerate all the items in history”.)
For example, if history is [[null,null,null], ["X",null,null]] and nextSquares is ["X",null,"O"], then the new [...history, nextSquares] array will be [[null,null,null], ["X",null,null], ["X",null,"O"]].
At this point, you’ve moved the state to live in the Game component, and the UI should be fully working, just as it was before the refactor. Here is what the code should look like at this point:
import { useState } from 'react';

function Square({ value, onSquareClick }) {
  return (
    <button className="square" onClick={onSquareClick}>
      {value}
    </button>
  );
}

function Board({ xIsNext, squares, onPlay }) {
  function handleClick(i) {
    if (calculateWinner(squares) || squares[i]) {
      return;
    }
    const nextSquares = squares.slice();
    if (xIsNext) {
      nextSquares[i] = 'X';
    } else {
      nextSquares[i] = 'O';
    }
    onPlay(nextSquares);
  }

  const winner = calculateWinner(squares);
  let status;
  if (winner) {
    status = 'Winner: ' + winner;
  } else {
    status = 'Next player: ' + (xIsNext ? 'X' : 'O');
  }

  return (
    <>
      <div className="status">{status}</div>
      <div className="board-row">
        <Square value={squares[0]} onSquareClick={() => handleClick(0)} />
        <Square value={squares[1]} onSquareClick={() => handleClick(1)} />
        <Square value={squares[2]} onSquareClick={() => handleClick(2)} />
      </div>
      <div className="board-row">
        <Square value={squares[3]} onSquareClick={() => handleClick(3)} />
        <Square value={squares[4]} onSquareClick={() => handleClick(4)} />
        <Square value={squares[5]} onSquareClick={() => handleClick(5)} />
      </div>
      <div className="board-row">
        <Square value={squares[6]} onSquareClick={() => handleClick(6)} />
        <Square value={squares[7]} onSquareClick={() => handleClick(7)} />
        <Square value={squares[8]} onSquareClick={() => handleClick(8)} />
      </div>
    </>
  );
}

export default function Game() {
  const [xIsNext, setXIsNext] = useState(true);
  const [history, setHistory] = useState([Array(9).fill(null)]);
  const currentSquares = history[history.length - 1];

  function handlePlay(nextSquares) {
    setHistory([...history, nextSquares]);
    setXIsNext(!xIsNext);
  }

  return (
    <div className="game">
      <div className="game-board">
        <Board xIsNext={xIsNext} squares={currentSquares} onPlay={handlePlay} />
      </div>
      <div className="game-info">
        <ol>{/*TODO*/}</ol>
      </div>
    </div>
  );
}

function calculateWinner(squares) {
  const lines = [
    [0, 1, 2],
    [3, 4, 5],
    [6, 7, 8],
    [0, 3, 6],
    [1, 4, 7],
    [2, 5, 8],
    [0, 4, 8],
    [2, 4, 6],
  ];
  for (let i = 0; i < lines.length; i++) {
    const [a, b, c] = lines[i];
    if (squares[a] && squares[a] === squares[b] && squares[a] === squares[c]) {
      return squares[a];
    }
  }
  return null;
}
Showing the past moves
Since you are recording the tic-tac-toe game’s history, you can now display a list of past moves to the player.
React elements like <button> are regular JavaScript objects; you can pass them around in your application. To render multiple items in React, you can use an array of React elements.
You already have an array of history moves in state, so now you need to transform it to an array of React elements. In JavaScript, to transform one array into another, you can use the array map method:
[1, 2, 3].map((x) => x * 2) // [2, 4, 6]You’ll use map to transform your history of moves into React elements representing buttons on the screen, and display a list of buttons to “jump” to past moves. Let’s map over the history in the Game component:
export default function Game() {
  const [xIsNext, setXIsNext] = useState(true);
  const [history, setHistory] = useState([Array(9).fill(null)]);
  const currentSquares = history[history.length - 1];

  function handlePlay(nextSquares) {
    setHistory([...history, nextSquares]);
    setXIsNext(!xIsNext);
  }

  function jumpTo(nextMove) {
    // TODO
  }

  const moves = history.map((squares, move) => {
    let description;
    if (move > 0) {
      description = 'Go to move #' + move;
    } else {
      description = 'Go to game start';
    }
    return (
      <li>
        <button onClick={() => jumpTo(move)}>{description}</button>
      </li>
    );
  });

  return (
    <div className="game">
      <div className="game-board">
        <Board xIsNext={xIsNext} squares={currentSquares} onPlay={handlePlay} />
      </div>
      <div className="game-info">
        <ol>{moves}</ol>
      </div>
    </div>
  );
}
You can see what your code should look like below. Note that you should see an error in the developer tools console that says: Warning: Each child in an array or iterator should have a unique "key" prop. Check the render method of `Game`. You’ll fix this error in the next section.
import { useState } from 'react';

function Square({ value, onSquareClick }) {
  return (
    <button className="square" onClick={onSquareClick}>
      {value}
    </button>
  );
}

function Board({ xIsNext, squares, onPlay }) {
  function handleClick(i) {
    if (calculateWinner(squares) || squares[i]) {
      return;
    }
    const nextSquares = squares.slice();
    if (xIsNext) {
      nextSquares[i] = 'X';
    } else {
      nextSquares[i] = 'O';
    }
    onPlay(nextSquares);
  }

  const winner = calculateWinner(squares);
  let status;
  if (winner) {
    status = 'Winner: ' + winner;
  } else {
    status = 'Next player: ' + (xIsNext ? 'X' : 'O');
  }

  return (
    <>
      <div className="status">{status}</div>
      <div className="board-row">
        <Square value={squares[0]} onSquareClick={() => handleClick(0)} />
        <Square value={squares[1]} onSquareClick={() => handleClick(1)} />
        <Square value={squares[2]} onSquareClick={() => handleClick(2)} />
      </div>
      <div className="board-row">
        <Square value={squares[3]} onSquareClick={() => handleClick(3)} />
        <Square value={squares[4]} onSquareClick={() => handleClick(4)} />
        <Square value={squares[5]} onSquareClick={() => handleClick(5)} />
      </div>
      <div className="board-row">
        <Square value={squares[6]} onSquareClick={() => handleClick(6)} />
        <Square value={squares[7]} onSquareClick={() => handleClick(7)} />
        <Square value={squares[8]} onSquareClick={() => handleClick(8)} />
      </div>
    </>
  );
}

export default function Game() {
  const [xIsNext, setXIsNext] = useState(true);
  const [history, setHistory] = useState([Array(9).fill(null)]);
  const currentSquares = history[history.length - 1];

  function handlePlay(nextSquares) {
    setHistory([...history, nextSquares]);
    setXIsNext(!xIsNext);
  }

  function jumpTo(nextMove) {
    // TODO
  }

  const moves = history.map((squares, move) => {
    let description;
    if (move > 0) {
      description = 'Go to move #' + move;
    } else {
      description = 'Go to game start';
    }
    return (
      <li>
        <button onClick={() => jumpTo(move)}>{description}</button>
      </li>
    );
  });

  return (
    <div className="game">
      <div className="game-board">
        <Board xIsNext={xIsNext} squares={currentSquares} onPlay={handlePlay} />
      </div>
      <div className="game-info">
        <ol>{moves}</ol>
      </div>
    </div>
  );
}

function calculateWinner(squares) {
  const lines = [
    [0, 1, 2],
    [3, 4, 5],
    [6, 7, 8],
    [0, 3, 6],
    [1, 4, 7],
    [2, 5, 8],
    [0, 4, 8],
    [2, 4, 6],
  ];
  for (let i = 0; i < lines.length; i++) {
    const [a, b, c] = lines[i];
    if (squares[a] && squares[a] === squares[b] && squares[a] === squares[c]) {
      return squares[a];
    }
  }
  return null;
}
As you iterate through history array inside the function you passed to map, the squares argument goes through each element of history, and the move argument goes through each array index: 0, 1, 2, …. (In most cases, you’d need the actual array elements, but to render a list of moves you will only need indexes.)
For each move in the tic-tac-toe game’s history, you create a list item <li> which contains a button <button>. The button has an onClick handler which calls a function called jumpTo (that you haven’t implemented yet).
For now, you should see a list of the moves that occurred in the game and an error in the developer tools console. Let’s discuss what the “key” error means.
Picking a key
When you render a list, React stores some information about each rendered list item. When you update a list, React needs to determine what has changed. You could have added, removed, re-arranged, or updated the list’s items.
Imagine transitioning from
<li>Alexa: 7 tasks left</li>
<li>Ben: 5 tasks left</li>
to
<li>Ben: 9 tasks left</li>
<li>Claudia: 8 tasks left</li>
<li>Alexa: 5 tasks left</li>
In addition to the updated counts, a human reading this would probably say that you swapped Alexa and Ben’s ordering and inserted Claudia between Alexa and Ben. However, React is a computer program and can’t know what you intended, so you need to specify a key property for each list item to differentiate each list item from its siblings. If your data was from a database, Alexa, Ben, and Claudia’s database IDs could be used as keys.
<li key={user.id}>
  {user.name}: {user.taskCount} tasks left
</li>
When a list is re-rendered, React takes each list item’s key and searches the previous list’s items for a matching key. If the current list has a key that didn’t exist before, React creates a component. If the current list is missing a key that existed in the previous list, React destroys the previous component. If two keys match, the corresponding component is moved.
Keys tell React about the identity of each component, which allows React to maintain state between re-renders. If a component’s key changes, the component will be destroyed and re-created with a new state.
key is a special and reserved property in React. When an element is created, React extracts the key property and stores the key directly on the returned element. Even though key may look like it is passed as props, React automatically uses key to decide which components to update. There’s no way for a component to ask what key its parent specified.
It’s strongly recommended that you assign proper keys whenever you build dynamic lists. If you don’t have an appropriate key, you may want to consider restructuring your data so that you do.
If no key is specified, React will report an error and use the array index as a key by default. Using the array index as a key is problematic when trying to re-order a list’s items or inserting/removing list items. Explicitly passing key={i} silences the error but has the same problems as array indices and is not recommended in most cases.
Keys do not need to be globally unique; they only need to be unique between components and their siblings.
Implementing time travel
In the tic-tac-toe game’s history, each past move has a unique ID associated with it: it’s the sequential number of the move. Moves will never be re-ordered, deleted, or inserted in the middle, so it’s safe to use the move index as a key.
In the Game function, you can add the key as <li key={move}>, and if you reload the rendered game, React’s “key” error should disappear:
const moves = history.map((squares, move) => {
  //...
  return (
    <li key={move}>
      <button onClick={() => jumpTo(move)}>{description}</button>
    </li>
  );
});import { useState } from 'react'; function Square({ value, onSquareClick }) { return ( <button className="square" onClick={onSquareClick}> {value} </button> ); } function Board({ xIsNext, squares, onPlay }) { function handleClick(i) { if (calculateWinner(squares) || squares[i]) { return; } const nextSquares = squares.slice(); if (xIsNext) { nextSquares[i] = 'X'; } else { nextSquares[i] = 'O'; } onPlay(nextSquares); } const winner = calculateWinner(squares); let status; if (winner) { status = 'Winner: ' + winner; } else { status = 'Next player: ' + (xIsNext ? 'X' : 'O'); } return ( <> <div className="status">{status}</div> <div className="board-row"> <Square value={squares[0]} onSquareClick={() => handleClick(0)} /> <Square value={squares[1]} onSquareClick={() => handleClick(1)} /> <Square value={squares[2]} onSquareClick={() => handleClick(2)} /> </div> <div className="board-row"> <Square value={squares[3]} onSquareClick={() => handleClick(3)} /> <Square value={squares[4]} onSquareClick={() => handleClick(4)} /> <Square value={squares[5]} onSquareClick={() => handleClick(5)} /> </div> <div className="board-row"> <Square value={squares[6]} onSquareClick={() => handleClick(6)} /> <Square value={squares[7]} onSquareClick={() => handleClick(7)} /> <Square value={squares[8]} onSquareClick={() => handleClick(8)} /> </div> </> ); } export default function Game() { const [xIsNext, setXIsNext] = useState(true); const [history, setHistory] = useState([Array(9).fill(null)]); const currentSquares = history[history.length - 1]; function handlePlay(nextSquares) { setHistory([...history, nextSquares]); setXIsNext(!xIsNext); } function jumpTo(nextMove) { // TODO } const moves = history.map((squares, move) => { let description; if (move > 0) { description = 'Go to move #' + move; } else { description = 'Go to game start'; } return ( <li key={move}> <button onClick={() => jumpTo(move)}>{description}</button> </li> ); }); return ( <div className="game"> <div className="game-board"> <Board xIsNext={xIsNext} squares={currentSquares} onPlay={handlePlay} /> </div> <div className="game-info"> <ol>{moves}</ol> </div> </div> ); } function calculateWinner(squares) { const lines = [ [0, 1, 2], [3, 4, 5], [6, 7, 8], [0, 3, 6], [1, 4, 7], [2, 5, 8], [0, 4, 8], [2, 4, 6], ]; for (let i = 0; i < lines.length; i++) { const [a, b, c] = lines[i]; if (squares[a] && squares[a] === squares[b] && squares[a] === squares[c]) { return squares[a]; } } return null; }
Before you can implement jumpTo, you need the Game component to keep track of which step the user is currently viewing. To do this, define a new state variable called currentMove, defaulting to 0:
export default function Game() {
  const [xIsNext, setXIsNext] = useState(true);
  const [history, setHistory] = useState([Array(9).fill(null)]);
  const [currentMove, setCurrentMove] = useState(0);
  const currentSquares = history[history.length - 1];
  //...
}
Next, update the jumpTo function inside Game to update that currentMove. You’ll also set xIsNext to true if the number that you’re changing currentMove to is even.
export default function Game() {
  // ...
  function jumpTo(nextMove) {
    setCurrentMove(nextMove);
    setXIsNext(nextMove % 2 === 0);
  }
  //...
}
You will now make two changes to the Game’s handlePlay function which is called when you click on a square.
- If you “go back in time” and then make a new move from that point, you only want to keep the history up to that point. Instead of adding
nextSquaresafter all items (...spread syntax) inhistory, you’ll add it after all items inhistory.slice(0, currentMove + 1)so that you’re only keeping that portion of the old history. - Each time a move is made, you need to update
currentMoveto point to the latest history entry.
function handlePlay(nextSquares) {
  const nextHistory = [...history.slice(0, currentMove + 1), nextSquares];
  setHistory(nextHistory);
  setCurrentMove(nextHistory.length - 1);
  setXIsNext(!xIsNext);
}
Finally, you will modify the Game component to render the currently selected move, instead of always rendering the final move:
export default function Game() {
  const [xIsNext, setXIsNext] = useState(true);
  const [history, setHistory] = useState([Array(9).fill(null)]);
  const [currentMove, setCurrentMove] = useState(0);
  const currentSquares = history[currentMove];

  // ...
}
If you click on any step in the game’s history, the tic-tac-toe board should immediately update to show what the board looked like after that step occurred.
import { useState } from 'react';

function Square({value, onSquareClick}) {
  return (
    <button className="square" onClick={onSquareClick}>
      {value}
    </button>
  );
}

function Board({ xIsNext, squares, onPlay }) {
  function handleClick(i) {
    if (calculateWinner(squares) || squares[i]) {
      return;
    }
    const nextSquares = squares.slice();
    if (xIsNext) {
      nextSquares[i] = 'X';
    } else {
      nextSquares[i] = 'O';
    }
    onPlay(nextSquares);
  }

  const winner = calculateWinner(squares);
  let status;
  if (winner) {
    status = 'Winner: ' + winner;
  } else {
    status = 'Next player: ' + (xIsNext ? 'X' : 'O');
  }

  return (
    <>
      <div className="status">{status}</div>
      <div className="board-row">
        <Square value={squares[0]} onSquareClick={() => handleClick(0)} />
        <Square value={squares[1]} onSquareClick={() => handleClick(1)} />
        <Square value={squares[2]} onSquareClick={() => handleClick(2)} />
      </div>
      <div className="board-row">
        <Square value={squares[3]} onSquareClick={() => handleClick(3)} />
        <Square value={squares[4]} onSquareClick={() => handleClick(4)} />
        <Square value={squares[5]} onSquareClick={() => handleClick(5)} />
      </div>
      <div className="board-row">
        <Square value={squares[6]} onSquareClick={() => handleClick(6)} />
        <Square value={squares[7]} onSquareClick={() => handleClick(7)} />
        <Square value={squares[8]} onSquareClick={() => handleClick(8)} />
      </div>
    </>
  );
}

export default function Game() {
  const [xIsNext, setXIsNext] = useState(true);
  const [history, setHistory] = useState([Array(9).fill(null)]);
  const [currentMove, setCurrentMove] = useState(0);
  const currentSquares = history[currentMove];

  function handlePlay(nextSquares) {
    const nextHistory = [...history.slice(0, currentMove + 1), nextSquares];
    setHistory(nextHistory);
    setCurrentMove(nextHistory.length - 1);
    setXIsNext(!xIsNext);
  }

  function jumpTo(nextMove) {
    setCurrentMove(nextMove);
    setXIsNext(nextMove % 2 === 0);
  }

  const moves = history.map((squares, move) => {
    let description;
    if (move > 0) {
      description = 'Go to move #' + move;
    } else {
      description = 'Go to game start';
    }
    return (
      <li key={move}>
        <button onClick={() => jumpTo(move)}>{description}</button>
      </li>
    );
  });

  return (
    <div className="game">
      <div className="game-board">
        <Board xIsNext={xIsNext} squares={currentSquares} onPlay={handlePlay} />
      </div>
      <div className="game-info">
        <ol>{moves}</ol>
      </div>
    </div>
  );
}

function calculateWinner(squares) {
  const lines = [
    [0, 1, 2],
    [3, 4, 5],
    [6, 7, 8],
    [0, 3, 6],
    [1, 4, 7],
    [2, 5, 8],
    [0, 4, 8],
    [2, 4, 6],
  ];
  for (let i = 0; i < lines.length; i++) {
    const [a, b, c] = lines[i];
    if (squares[a] && squares[a] === squares[b] && squares[a] === squares[c]) {
      return squares[a];
    }
  }
  return null;
}
Final cleanup
If you look at the code very closely, you may notice that xIsNext === true when currentMove is even and xIsNext === false when currentMove is odd. In other words, if you know the value of currentMove, then you can always figure out what xIsNext should be.
There’s no reason for you to store both of these in state. In fact, always try to avoid redundant state. Simplifying what you store in state reduces bugs and makes your code easier to understand. Change Game so that it doesn’t store xIsNext as a separate state variable and instead figures it out based on the currentMove:
export default function Game() {
  const [history, setHistory] = useState([Array(9).fill(null)]);
  const [currentMove, setCurrentMove] = useState(0);
  const xIsNext = currentMove % 2 === 0;
  const currentSquares = history[currentMove];

  function handlePlay(nextSquares) {
    const nextHistory = [...history.slice(0, currentMove + 1), nextSquares];
    setHistory(nextHistory);
    setCurrentMove(nextHistory.length - 1);
  }

  function jumpTo(nextMove) {
    setCurrentMove(nextMove);
  }
  // ...
}
You no longer need the xIsNext state declaration or the calls to setXIsNext. Now, there’s no chance for xIsNext to get out of sync with currentMove, even if you make a mistake while coding the components.
Wrapping up
Congratulations! You’ve created a tic-tac-toe game that:
- Lets you play tic-tac-toe,
- Indicates when a player has won the game,
- Stores a game’s history as a game progresses,
- Allows players to review a game’s history and see previous versions of a game’s board.
Nice work! We hope you now feel like you have a decent grasp of how React works.
Check out the final result here:
import { useState } from 'react';

function Square({ value, onSquareClick }) {
  return (
    <button className="square" onClick={onSquareClick}>
      {value}
    </button>
  );
}

function Board({ xIsNext, squares, onPlay }) {
  function handleClick(i) {
    if (calculateWinner(squares) || squares[i]) {
      return;
    }
    const nextSquares = squares.slice();
    if (xIsNext) {
      nextSquares[i] = 'X';
    } else {
      nextSquares[i] = 'O';
    }
    onPlay(nextSquares);
  }

  const winner = calculateWinner(squares);
  let status;
  if (winner) {
    status = 'Winner: ' + winner;
  } else {
    status = 'Next player: ' + (xIsNext ? 'X' : 'O');
  }

  return (
    <>
      <div className="status">{status}</div>
      <div className="board-row">
        <Square value={squares[0]} onSquareClick={() => handleClick(0)} />
        <Square value={squares[1]} onSquareClick={() => handleClick(1)} />
        <Square value={squares[2]} onSquareClick={() => handleClick(2)} />
      </div>
      <div className="board-row">
        <Square value={squares[3]} onSquareClick={() => handleClick(3)} />
        <Square value={squares[4]} onSquareClick={() => handleClick(4)} />
        <Square value={squares[5]} onSquareClick={() => handleClick(5)} />
      </div>
      <div className="board-row">
        <Square value={squares[6]} onSquareClick={() => handleClick(6)} />
        <Square value={squares[7]} onSquareClick={() => handleClick(7)} />
        <Square value={squares[8]} onSquareClick={() => handleClick(8)} />
      </div>
    </>
  );
}

export default function Game() {
  const [history, setHistory] = useState([Array(9).fill(null)]);
  const [currentMove, setCurrentMove] = useState(0);
  const xIsNext = currentMove % 2 === 0;
  const currentSquares = history[currentMove];

  function handlePlay(nextSquares) {
    const nextHistory = [...history.slice(0, currentMove + 1), nextSquares];
    setHistory(nextHistory);
    setCurrentMove(nextHistory.length - 1);
  }

  function jumpTo(nextMove) {
    setCurrentMove(nextMove);
  }

  const moves = history.map((squares, move) => {
    let description;
    if (move > 0) {
      description = 'Go to move #' + move;
    } else {
      description = 'Go to game start';
    }
    return (
      <li key={move}>
        <button onClick={() => jumpTo(move)}>{description}</button>
      </li>
    );
  });

  return (
    <div className="game">
      <div className="game-board">
        <Board xIsNext={xIsNext} squares={currentSquares} onPlay={handlePlay} />
      </div>
      <div className="game-info">
        <ol>{moves}</ol>
      </div>
    </div>
  );
}

function calculateWinner(squares) {
  const lines = [
    [0, 1, 2],
    [3, 4, 5],
    [6, 7, 8],
    [0, 3, 6],
    [1, 4, 7],
    [2, 5, 8],
    [0, 4, 8],
    [2, 4, 6],
  ];
  for (let i = 0; i < lines.length; i++) {
    const [a, b, c] = lines[i];
    if (squares[a] && squares[a] === squares[b] && squares[a] === squares[c]) {
      return squares[a];
    }
  }
  return null;
}
If you have extra time or want to practice your new React skills, here are some ideas for improvements that you could make to the tic-tac-toe game, listed in order of increasing difficulty:
- For the current move only, show “You are at move #…” instead of a button.
- Rewrite
Boardto use two loops to make the squares instead of hardcoding them. - Add a toggle button that lets you sort the moves in either ascending or descending order.
- When someone wins, highlight the three squares that caused the win (and when no one wins, display a message about the result being a draw).
- Display the location for each move in the format (row, col) in the move history list.
Throughout this tutorial, you’ve touched on React concepts including elements, components, props, and state. Now that you’ve seen how these concepts work when building a game, check out Thinking in React to see how the same React concepts work when build an app’s UI.